
Installing Printers on Macs
1. Update the printer drivers
For the Watershed Copier at CWS 1105J:
- Download the driver here (updated 5/7/14)
- Choose Drivers and Software
- From the Operating System drop down menu, select the appropriate OS X version.
- Click on Drivers
- Locate the latest version of the UFRII driver
- Click on the ‘+’ next to the driver to verify that is is compatible with the OS version on the machine
- Follow the driver installation instructions to activate the new driver installation
- Next, click on the zip file name to download the driver, and agree to the Terms & Conditions.
- Navigate to the Downloads directory on your Mac (or the location to where you saved the zip file)
- Double click on the zip file and locate the installer in the zip file.
- Double click the installer and complete the driver installation instructions.
For the printer at CWS 2101:
- Download the driver from here (updated 7/12/17).
- Under Available software for the following operating system, select Change.
- Under Operating system, select Mac OS. Under Version, select the version of your OS. Then click Change.
- You will see a list of drivers to download.
- Download HP Easy Start and run the installer.
- You will need to be connected to the network for the installer to find the printer. You can skip to Step 2 and then come back here.
- Follow the instructions in the installer. You can uncheck anything that comes checked except for accepting the terms and conditions.
- When it’s time to select the right printer, select HP LaserJet Pro 400 M401n.
- Then install Essential Software.
- Then Add and verify the printer. You can print a test page if you want to.
- Then click Continue and then Continue Online.
2. Make sure you are on the network
Install the GlobalProtect VPN client for Mac. Instructions are here. Make sure you are connected to the VPN using your kerberos credentials.

3. Navigate to Printers & Scanner
1.Click the Apple icon on the top left of your Mac
2. Open System Preferences
3. Choose Printers & Scanners

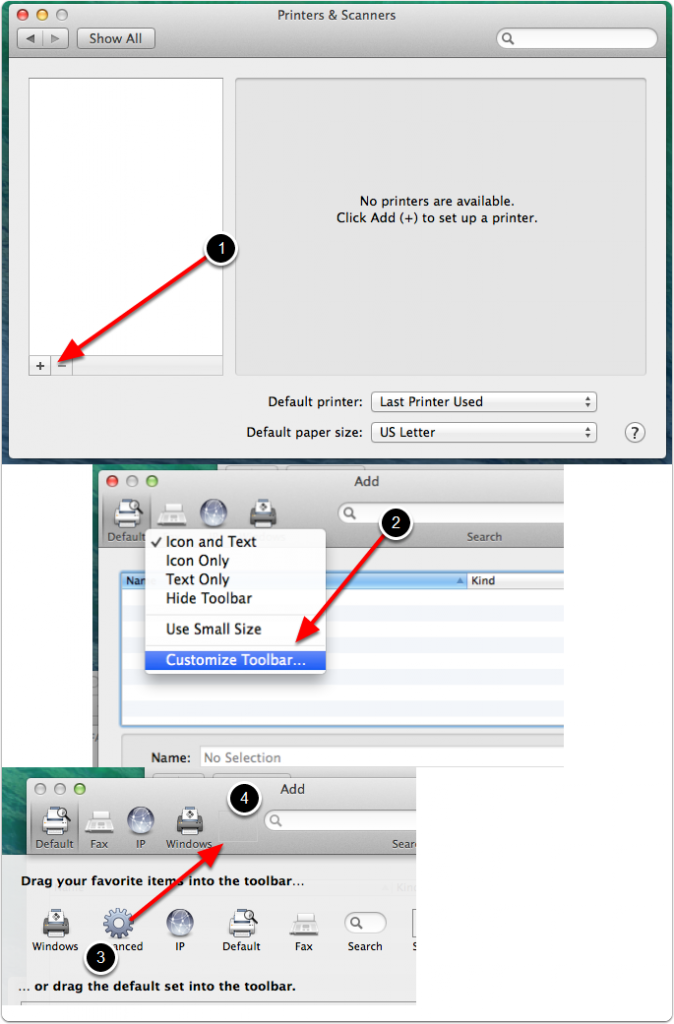
4. Customize Add Printer Toolbar
1. On the bottom left of “Printers” Click on the ‘+’’
2. Hold Control and click on Default. Select Customize Toolbar.
3. Drag the Advanced icon to the toolbar and click on the newly added Advanced button.
6. Now Add Printer
1. Select Windows printer via spoolss in Type.
2. For the URL, enter smb://coe-it-pcprint.ou.ad3.ucdavis.edu/CWS-Copier-Canon-iR4225 for the kitchen printer and smb://coe-it-pcprint.ou.ad3.ucdavis.edu/CWS-Magic-Carpet-HP-Laser-M401 for the Center of Universe printer.
3. In the name field enter CWS Copier for the kitchen printer and CWS Magic Carpet for the Center of Universe printer.
4. Under the Use field click Choose a Driver… and click Select Software
5. In the search bar look up “4225” and select the Canon iR4225/iR4570 driver for the kitchen printer. Look up “hp laserjet 400” and select the HP LaserJet 400 M401 driver for the Center of Universe printer.
6. Press ok.
7. Click Add

When printing
Select the CWS Copier printer and enter your kerberos [email protected] and password.
So if your username is nrsantos type in [email protected].
** If you get a message along the lines of “hold for authentication” and you are certain that you have tried the instruction above please contact the administrator or the person responsible for your account. You may need to use an alternate format AD3\username (e.g. AD3\nrsantos).
**Check the Remember this password in my keychain if you want to skip having to enter this every time you want to use the CWS Copier.
Advanced Features
You can enable the CUPS printer configuration page at http://localhost:631/printers with this command on the terminal "cupsctl WebInterface=yes". See this post for more details.