
Getting Started at CWS
Welcome to CWS. This article will help you get access to computing resources such as software, data and project folders, printers, servers, and the network.
Getting Access to Resources
It is important you understand the campus Acceptable Use Policy, in particular section V detailing Unacceptable Conduct: https://ucdavispolicy.ellucid.com/documents/view/359/
To start you should:
- First fill out our new user form
- Send an email to [email protected] to request access (you can view your service requests at the Service Hub) and copy your supervisor or PI on the email. In the email, include that you’ve already filled out the form online.
When your access has been set up (usually within 24 hours), you will get an email in response letting you know that your account is ready. All resources use campus accounts unless you are specifically told by IT staff to use another account.
Network Drives
After your account is given access, you should be able to log in to any CWS managed desktop or terminal server (see section on Terminal Servers) using your campus account. Once logged in you will see three network drives X, Y, and Z from Windows Explorer.

Drive X is where projects are located, and if you need access to specific data folders, you can find them in there. If you need a new project folder created, you can send an email request to [email protected] and tell us the name of the project folder, who should have access, and copy your PI.
Drive Z is your home folder – a place to store data and documents that need to be backed up and usable across computers, but which aren’t part of an existing project. If you need to store files privately so others can’t see them, you can put them in the “private” folder in your Z drive. Drive Y is where you can access everyone else’s home folders – organized by username.
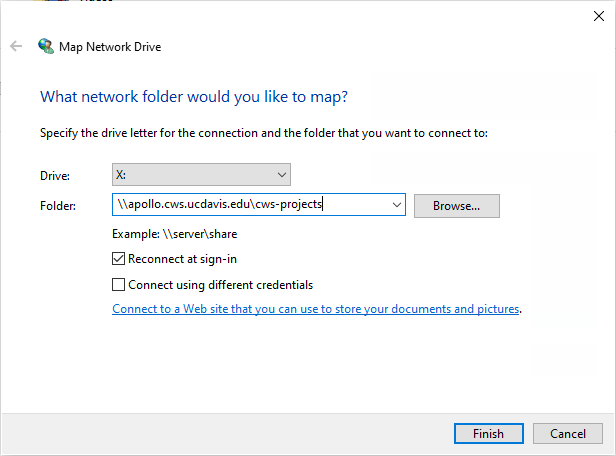
You can manually map the X:\ drive from a CWS managed computer if the automapping policy fails. From File Manager select the "This PC" icon on the left column. Then from the top select the "Computer" tab and click "Map network drive". Choose these parameters.
Drive: X:
Folder: \\apollo.cws.ucdavis.edu\cws-projects\
Check Reconnect at sign-in
Click Finish.
Access network drives from a personally owned PC
If you are not using a CWS computer, you can learn more about setting up access to these folders on your own computer here:
Terminal Servers
If you need access to specific software such as ArcGIS, HEC-RAS, etc, you can use our terminal servers. They come pre-loaded with many pieces of software you can use as well as access to the drives mentioned above.
- From CWS and personal Windows-based computers use Remote Desktop which is preinstalled.
- From a personal Mac computer, you can follow these instructions.
See our list of servers and their URLs to use in Remote Desktop.
VPN
If you need to access CWS data from home or elsewhere, or from campus WiFi, the easiest method is to use the servers above, using Remote Desktop. Those servers are accessible from anywhere with an Internet connection.
If you need access to network drives and printers from home or campus WiFi, and need to use your own computer, you can use the VPN. Instructions for setting it up can be found here.
Printers
On computers managed by CWS and on servers, printers will just show up automatically. You can also browse for printers from File Manager by typing \\coe-it-pcprint.ou.ad3.ucdavis.edu and looking for the following printers:
| Printer | Location |
|
CWS-Copier-Canon-iR4225 |
CWS 1105J (kitchen) |
|
CWS-Color-Laser-5550 |
CWS 1105 |
|
CWS-Putting-Green-HP-Laser-M451 |
RETIRED |
| CWS-Magic-Carpet-HP-Laser-M401 | RETIRED |
If you’re using your own computer and need to set up a printer you can follow the following instructions:
For all other questions, please browse this site, or send an email to [email protected]. Good luck!